Minimally Invasive Arthroscopic Surgery to Treat Shoulder Pain
Shoulder Arthroscopy
This is a minimally invasive surgical procedure in which an examination and treatment of a shoulder joint is performed using an arthroscope. The joint space is filled with sterile saline solution and surgical instruments are inserted through small keyhole incisions. An arthroscope is a thin fiber-optic tube which is about the diameter of a drinking straw. It is fitted with a miniature camera and light source that enables your surgeon to examine and repair your injured or diseased joint. Types of surgeries performed using an arthroscope are bone spur removal, rotator cuff repair, labrum repair, biceps tendon repair, and scar tissue removal.
Treating Shoulder Conditions
Shoulder Anatomy
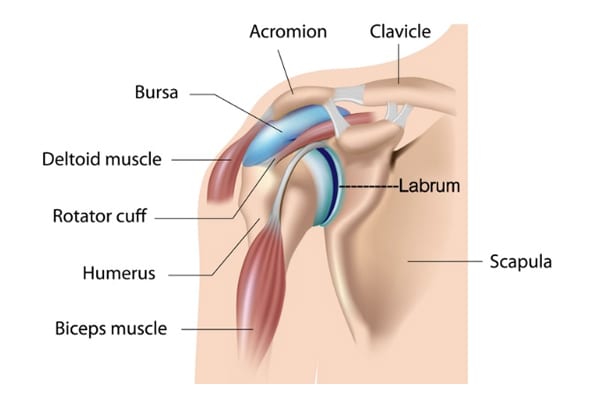
The shoulder joint is the most flexible joint in the entire human body and is formed by the union of the humerus (upper arm), the scapula (shoulder blade), and the clavicle (collar bone). Along with tendons and muscles of the rotator cuff, ligaments, labrum, biceps muscle and tendon, and bursa, they help you reach, swing, and lift in comfort.
Shoulder Arthroscopy
This is a minimally invasive surgical procedure in which an examination and treatment of a shoulder joint is performed using an arthroscope. The joint space is filled with sterile saline solution and surgical instruments are inserted through small keyhole incisions. An arthroscope is a thin fiber-optic tube which is about the diameter of a drinking straw. It is fitted with a miniature camera and light source that enables your surgeon to examine and repair your injured or diseased joint. Types of surgeries performed using an arthroscope are bone spur removal, rotator cuff repair, labrum repair, biceps tendon repair, and scar tissue removal.
Procedures
- Manipulation Under Anesthesia: We move your shoulder while you are sedated to release scar tissue and adhesion (frozen shoulder). This will help increase range of motion and decrease pain.
- Subacromial Decompression: A bone spur can grow over time that abrades on your rotator cuff. This can be shaved down with a burr. Once that space is opened up, the cause of your pain is gone.
- Acromioclavicular Joint Resection: Arthritis can develop in the joint between the clavicle (collarbone) and acromion. By debriding this joint and resecting the distal clavicle, the space is opened up, relieving the chronic osteoarthritic pain that develops over time.
- Rotator Cuff Repair: The rotator cuff is a group of muscles and tendons that surround the shoulder joint. These muscles can tear from an acute injury, or through chronic repetitive activities. Over-head activities are high risk for this type of injury. Most tears can be repaired arthroscopically using a combination of sutures and anchors to hold tissue in place as it heals.
- Labral Repair: The labrum is a fibrocartilage ring around the shoulder joint. If this is damaged or torn, you may feel pain, instability and a feeling that something is catching in that joint as it moves. This tissue can be trimmed and repaired with sutures and anchors.
- Biceps Tenodesis: The bicep muscle flexes your arm at the elbow. It connects at the shoulder and forearm. This procedure repairs a proximal biceps tendon tear at the shoulder by reattaching it to the proximal humerus bone. This procedure can be done arthroscopically or as an open procedure depending on the extent of the tear.
This is a minimal invasive procedure that can be done as an outpatient where you can go home the same day. Minimally invasive surgical techniques allow for lower complication rates and a quicker recovery. Our patients are able to start mobilizing their arm the day after surgery, significantly shortening their time away from their normal activity level.
Indications: Indications for surgery are inability to sleep or function due to persistent pain, trouble lifting, reaching, and/or instability. If conservative treatment fails, and you are unable to function as you normally would like to, surgery is the next step in getting you well.
Anesthesia
This procedure is done under general anesthesia which means you will be put to sleep with medications, and you will not feel anything during the procedure. A local nerve block may be administered to help with immediate post op pain.
Surgery Time
Approximately 30 minutes to 1 hour.
Hospital Stay
Approximately 5 hours. This is an outpatient procedure and rarely do you have to stay overnight.
Average Total Recovery Time
Our patients wear a sling for 24 hours. The next day, that sling is removed, and you start mobilizing your arm for a faster recovery. Recovery can be from 3 weeks to 3 months, depending on the extent of injury to your shoulder that is found during surgery. The longer you delay surgery, the longer your recovery time will be.
Incision
You will have three to five 1/2-inch incisions with either subcutaneous (under the skin) stitches or visible nylon stitches on the outer skin.
Possible Complications
Infection, nerve damage, scar tissue, and anesthesia risk. These happen in less than 1% of the surgeries we have performed.
Normal Post-Operative Occurrences
You may experience bruising, mild to moderate discomfort, swelling, and drainage. You may also have an elevated temperature which is normal after any surgery. Let us know if your temp is 101.5⁰ or above and is not brought down with Tylenol. Since we are unable to use a tourniquet, you will experience some bruising. It is normal to have bruising around the neck, arm, and chest. Icing will help the pain, swelling, and bruising.
Icing After Surgery
We highly recommend a Game Ready ice machine for icing your shoulder. It is a machine with a sleeve that covers the front and back of your shoulder and is connected to a hose and a reservoir that holds ice and water. Instead of using ice from the freezer, you can freeze 14- 8-oz bottles of water. Use 7 of them in the Game Ready reservoir at a time. It helps with pain, bruising, and swelling. We highly recommend you rent a Game Ready since physical therapy is not required. Reserve a Game Ready before your surgery by calling the representative for Game Ready, Kameron, at 205-269-0200. Insurance does not cover it and your cost is $100 a week.
Your shoulder bandage is thick so you will ice constantly the first 24 hours. Keep icing constantly during the day. After you return your Game Ready, you may make your own ice mixture by mixing 1 cup of rubbing alcohol and 3 cups of water into a zip lock bag and placing the bag in the freezer. It will be slushy and colder than a normal ice bag.
Before Being Discharged
Make sure you void before leaving the hospital. If you cannot void within 8 hours of the surgery, you may need a catheter to empty your bladder. Your nurse may also give you medications to help you void after surgery. Make sure your surgical drain has been removed before being discharged.
Dressing
You will have a dressing and a drain in place after surgery. The drain will be removed before you leave the hospital, and your dressing can be removed after 24 hours. You might have small strips of tape (steri-strips) on the incisions that will be removed after 7 days. If they come off before seven days, it is ok. Use band-aids or a light dressing after you remove the surgical dressings. Wear band-aids on your incisions until incisions have healed. In some cases, you may have staples/stitches, and they will be removed in the office during your first post-operative visit.
If you have mesh glued to your incision, it will be removed at your 2-week follow up appointment.
Shower
A shower is allowed 24 hours after surgery unless instructed differently. You should run hot water over your shoulder in the shower. After you get out of the shower, clean the incisions with alcohol. Do not use soap, lotion, or salve for the first 10 days. Apply band-aids over incisions.
Two hot showers a day are very beneficial and will help loosen your muscles up after surgery.
Medications
Your prescription after surgery will consist of pain medication, usually either Norco or Percocet. Phenergan or Zofran may also be given for nausea if needed. You will also receive Robaxin for muscle spasms. You may resume your anti-inflammatory medicine (Advil, Mobic, Celebrex, Lodine, Indocin, or Aleve) the day after surgery. Pain medication and anesthesia can cause constipation, so increase the bulk in your diet; and if needed, you can take a laxative. Over-the-counter medications are less likely to cause this problem so the sooner you can get off pain medicine the better you will feel.
Tylenol and Advil or Aleve can be taken together for pain to help decrease the need for narcotics. Two and Two, Twice a day will help reduce pain and narcotic use. (2 Tylenol & 2 Advil/Aleve together twice daily). If you have a prescription arthritis medication that takes the place of Advil/Aleve.
You may resume your home medications in the morning after surgery.
Sleep
If you have difficulty sleeping, we recommend a hot shower right before bed. You can also take your muscle relaxer (Robaxin/Methocarbamol) and/or Benadryl to help you sleep.
Driving
You may drive as soon as 48 hours if you are not taking any narcotic pain medication and you have good control of your arm. Normally, patients start driving after their first post-op visit.
Physical Therapy
Start your home exercises the day after surgery when you are fully awake and able to sit at a table. Most patients prefer to do Dr. Bramlett’s at-home exercise program and can expect a full recovery following his exercise regimen three times a day for 15 minutes each session. If you had a block you will have to wait for this to wear off and you are able to move your arm again.
We will evaluate your progress at your 2-week follow-up appointment and advance you to phase 2 exercises which will be wall exercises. In some cases, we may recommend you start seeing an outpatient physical therapist after this visit.
Exercises:
Start your exercises the day after surgery when you are fully awake and able to sit at a table. If there are restrictions, we will let you know. Do each exercise 5-10 times, three times a day. The first phase of exercises is referred to as double-hand sliding exercises.
Phase I Exercises:
- This first exercise is easier done while lying down in bed. With your hands clasped together at the chest, keeping elbows level with your hands, slowly move hands and elbows from your chest to your chin, chin to your nose, nose to your forehead, forehead to over your head and touch the back of the bed. Then move your arms side to side bringing your elbows to your ears.
- The next exercise is done sitting at a table with a towel under your hands. The towel makes it easier to slide your hands around the table. Sitting in a chair with your back straight and your hands clasped together at your chest, slowly slide hands across the table as far out as you can and back to your chest. Now slowly move your clasped hands from your chest and make wide circles around the table clockwise, then move counterclockwise. Do these with your hands together, then separate them and do them again.
Phase II Exercises:
After you have returned for your first post-op appointment and have mastered the Phase I exercises, we will advance you to Phase II. You will do these exercises 3-4 times a day for 15 minutes each session.
- With both hands together and standing 6-8 inches from the wall, slide your hands together straight up the wall above your head. Separate your hands, resting them against the wall. With both hands on the wall, make small, slow 8-12 inch circles on the wall as if you were scrubbing it. If you are tired rest your hands against the wall. Then turn to the side 90 degrees with your operative hand still on the wall and make circles with your operative hand on the wall. Keep your hands above eye level for this exercise. Grasp your hands together and slide them down the wall when you are finished. As this becomes easier, advance to making circles with four fingers instead of your hands, then use 3 fingers, then use 2 fingers, and then use just one finger. Progress to lifting your hands 1 inch off the wall, making small, slow 8-12-inch circles. When you are finished, bring your hands together and slowly lower them back down using the wall as support.
- If you have access to a swimming pool begin treading water backwards and forwards 5-10 minutes and increase time, as tolerated.
Returning to Work
In general, you should be able to resume desk work/light activity in 3-7 days and more strenuous activity in 2 weeks. Job duties and the extent of the surgery will dictate your return to work. You may limit overhead lifting initially and we will gradually increase activity as you recover.
Return to Office
Your post-op appointment will need to be 10-14 days after surgery. Call the office for an earlier appointment if you are having problems. Please call (205) 783-5900 to make that appointment.
Please call the office if any problems arise or with any other questions.
We are here to help. If you believe you are suffering from one of these conditions, we would love to deliver a diagnosis, get you treated and get you moving again.