Restoring function and relieving pain in the severely diseased shoulder
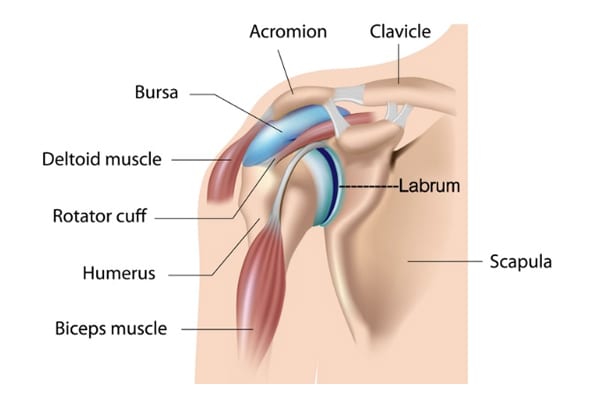
The shoulder joint is the most flexible joint in the entire human body and is formed by the union of the humerus (upper arm), the scapula (shoulder blade), and the clavicle (collar bone). Along with tendons and muscles of the rotator cuff, ligaments, labrum, biceps muscle and tendon, and bursa, they help you reach, swing, and lift in comfort. Below you can see a normal x-ray on the left, and a diseased x-ray on the right with an arrow pointing to the area with degenerative changes.
Treating Shoulder Conditions
Shoulder Arthroplasty or Reverse Shoulder Arthroplasty is a surgical procedure in which all or part of the glenohumeral joint is replaced by a prosthetic implant. Such joint replacement surgery generally is conducted to relieve severe arthritic pain and fix severe physical joint damage. If only the ball of the humorous is affected, a hemiarthroplasty (half-shoulder) replacement is done.

Indications: Indications for surgery are persistent pain, trouble lifting, reaching, and/or instability. This surgery can restore movement and function in a severely dysfunctional shoulder. If conservative treatment fails, surgery is the next step in relieving pain and restoring normal function.
Anesthesia: This procedure is done under general anesthesia which means you will be put to sleep with medications, and you will not feel anything during the procedure. A local nerve block may be administered to help with immediate post op pain.
Surgery Time: Approximately forty-five minutes to one hour.
Hospital Stay: Most of our total shoulder patients go home the same day, however, a few do stay the night.
Average Total Recovery Time: You will wear a sling for 24 hours. The day after your surgery, you will remove it start using your arm. Rehab exercises can be done on your own at home starting the day after surgery. Light activity and movement of your arm will advance immediately but complete recovery is anywhere from two to three months.
Incision: You will have a 4-6-inch incision on the front of your shoulder which will be closed with glue or staples.
Possible Complications: Infection, nerve damage, scar tissue, and anesthesia risk. These happen in less than 1% of the surgeries we have performed.
Normal Post-Operative Occurrences: You will experience bruising, mild to moderate discomfort, swelling and drainage. You may also have an elevated temperature which is normal after any type of surgery. Let us know if your temp is 101.5 or above and is not brought down with Tylenol. It is not unusual to have bruising around the neck, arm, and chest. Icing will help the pain, swelling, and bruising.
Icing after surgery
We highly recommend a Game Ready ice machine for icing your shoulder. It is a machine that has a sleeve that will cover the front and back of your shoulder and is connected to a hose and a reservoir that holds ice and water. Instead of using ice out of the freezer you can freeze 14- 8ox bottles of water and use 7 of them in the reservoir at a time. It helps with pain, bruising, and swelling. It is not covered by insurance and is $120 dollars a week. Your contact person for the Game Ready is Kameron – phone number is 205-269-0200. Call or text him after scheduling your surgery so he can make sure to set one aside for you. Your shoulder bandage is thick so you will ice a lot during the day and at night for comfort and pain control. After you turn your Game Ready in you may make your own ice bag by mixing 1 cup of rubbing alcohol and 3 cups of water, pouring it into a gallon zip lock bag, and freezing it. It will not get hard but will be slushy making it easier to cover the front and back of shoulder. This is much colder than a regular ice bag.
Dressing: You will have a dressing and possibly a drain in place after surgery. The drain will be removed before you leave the hospital, and your dressing can be removed after 48 hours after surgery. Remove the dressing prior to showering, rinse your incision, pat it dry with alcohol, and apply dressing of sterile gauze and tape. You will have staples or glue closing your incision. Staples will be removed at your 2-week follow-up appointment.
If you have mesh glued to your incision, it will be removed at your 2-week follow-up appointment.
Shower: A shower is allowed 48 hours after surgery unless instructed differently. Leave the mesh dressing on while showering. Running hot water over your shoulder will help with the pain and with loosening up your joint making it easier to do the simple exercises we give you. Two hot showers a day will help relax your muscles and help with stiffness.
Medications
Your prescription after surgery will consist of pain medication, usually either Norco or Percocet. Phenergan or Zofran may also be given for nausea if needed. You will also receive Robaxin for muscle spasms. You may resume your anti-inflammatory medicine (Advil, Mobic, Celebrex, Lodine, Indocin, or Aleve) the day after surgery. Pain medication and anesthesia can cause constipation, so increase the bulk in your diet; and if needed, you can take a laxative. Over-the-counter medications are less likely to cause this problem so the sooner you can get off pain medicine the better you will feel.
Tylenol and Advil or Aleve can be taken together for pain to help decrease the need for narcotics. Two and Two, Twice a day will help reduce pain and narcotic use. (2 Tylenol & 2 Advil/Aleve together twice daily). If you have a prescription arthritis medication that takes the place of Advil/Aleve.
You may resume your home medications in the morning after surgery.
Sleep
If you have difficulty sleeping, we recommend a hot shower right before bed. You can also take your muscle relaxer (Robaxin/Methocarbamol) and/or Benadryl to help you sleep.
Driving: You may drive after your first post op visit if you are not taking narcotic pain medication, and you have good control of your arm.
Returning to Work: You should be able to resume desk work and light activity in 2-4 weeks, and more strenuous activity in 6-8 weeks. Job duties and extent of the surgery will dictate when you return to work. Some patients are able to resume working at a desk job 3-7 days after surgery.
Return to Office: You will have a return appointment in 2 weeks following surgery for an assessment of your post-operative condition. Call 205-783-5900 to make an appointment.
Physical Therapy: You should start your home exercises the day after surgery when you are fully awake. Most patients prefer to do Dr. Bramlett’s at home exercise program that he has developed and will have a full recovery doing these exercises three times a day for 15 minutes each session. Icing with the GameReady ice machine will help with pain after all exercises.
We will evaluate you at your 2-week appointment and advance you to the next phase of exercises. Outpatient physical therapy may be recommended at this time.
Antibiotics Information
A joint replacement reacts much like a heart valve replacement to bacteria circulation within the blood stream.
It is required that you have an antibiotic before you have any dental/oral procedures for life.
You cannot have any dental work until 3 months after your surgery.
We can call in a prescription or your dentist can do this for you. The antibiotic protocol for implant prophylaxis follows:
Amoxicillin 2.0 grams, taken orally one hour before procedure.
For amoxicillin/penicillin-allergic patients:
Clindamycin Adults, 600 mg given orally one hour before procedure
Cephalexin or cefadroxil: Adults, 2.0 grams orally one hour before procedure
Azithromycin or clarithromycin: Adults 500 mg orally one hour before procedure.
EXERCISES
The first exercises you do after surgery will be the exercises under Phase 1. You will do these 3- 4 times a day. Dr. Bramlett will let you know when to start your Phase II exercises.
Phase I
- Clasp your hands together at the chest and slowly slide hands across a table and back to your chest. This should take approximately one minute at the beginning. Remember to start out doing 2-4 of these and increase daily until you can do these exercises 10 times a session. If you put a towel under your hands your hands will slide across and around your table easily. Repeat 5-10 times.
- With your hands still clasped together at the chest slowly slide your hands in a wide clockwise circle around a table until you make a complete circle. Now slide your clasped hands in a counterclockwise circle. This should take approximately 1 minute. When this gets easy, separate your hands and make circles on the table first clockwise and then counterclockwise. Repeat 5 – 10 times.
- At first, this 3rd exercise is easier done while lying down in bed. With your hands clasped together at the chest keeping elbows level with your hands slowly move hands and elbows from your chest to your chin, then to your nose, then to your forehead. Repeat 5-10 times.
After you have returned for your first post-op appointment and have mastered the Phase I exercises Dr. Bramlett may add the following exercise regimen. You will do these exercises 3-4 times during the day for 10 – 15 minutes each.
Phase II
- With both hands together, standing 6 to 8 inches from the wall, slide your hands together straight up the wall above your head. Use the wall for support as you raise your hands above your head. Separate your hands keeping them on the wall. Now, with both hands on the wall, make small, slow 8 to 12 inch circles on the wall as if you were scrubbing it. If you are tired, rest your hands against the wall but be careful not to bring them down until you are finished. Turn 90 degrees to the side, keeping your operative arm on the wall. Make 8 to 12 inch circles again with the operative arm. When you are done, turn back facing the wall, and bring both hands together and slowly slide them back down the wall. These wall exercises should be done with your hands above eye level. As this becomes easier, advance to making circles with four fingers instead of your hands, then 3 fingers, then 2 fingers, and then one finger. Now progress to lifting your hands 1” off the wall, making small, slow 8” to 12” circles.
We are here to help. If you believe you are suffering from one of these conditions, we would love to deliver a diagnosis, get you treated and get you moving again.